Over the last 12+ years, writing popfiles has been simplified and evolved significantly. While many previous how-to guides are still valid, this information is scattered across random pockets of the internet and is hard to find. This will not be an exhaustive guide on what popfiles are or mission design (check the wiki for those), only how to set up the best environment to start writing.
VSCode is the preferred editor for writing popfiles, as it has multiple community-made extensions to simplify the process. Any of the trendy VSCode forks will work so long as you have access to extensions.
There are syntax highlighters and shortcuts for NP++ floating around somewhere, but these have not been updated in a long time. If you prefer NP++, you'll need to hunt these down and expand them yourself.
Extensions
Once you have VSCode installed, head to the "extensions" tab (or press Ctrl + Shift + X) and search for "mvm", you should see these 3 extensions:

VSCode VDF is a general-purpose Valve Data Format tool with a lot of amazing popfile-specific features. It is also useful for various things outside of just writing MvM popfiles (reading items_game.txt, editing soundscripts and vmt files, etc).
- Syntax highlighting
- Errors/warnings for invalid syntax
- Warnings for missing assets (sounds, icons, etc)
- Preview wave-bars in-editor
- Preview icons in-editor
- Color picker for
set item tint RGB
- Plenty of other features I'm probably missing
You can see a full list of popfile-specific features here
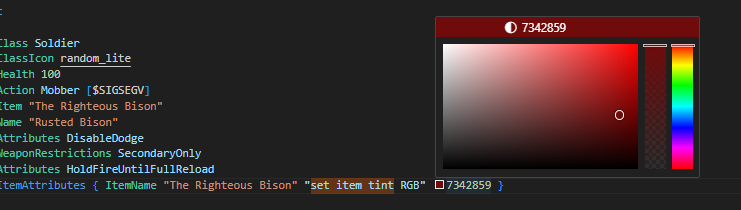
VSCode VDF's color picker
This is a relatively recent but extremely powerful extension that allows you to generate an entire mission with placeholder bots using VSCode snippets, the popfiles basically write themselves.
The extension page has a list of all available snippets, or you can simply install the extension, create a new file with the language set to Popfile, type ws, and a drop-down menu should appear that looks something like this:
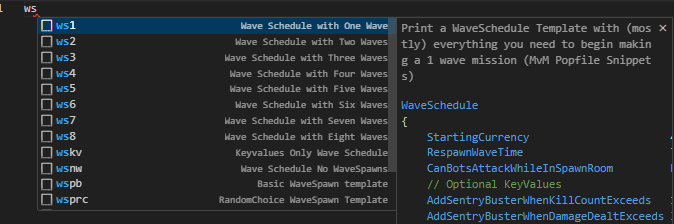
Select ws3 for example to generate a complete popfile with 3 waves ready to be modified, simply change values to your liking.
This extension is not as important nowadays due to VSCode VDF providing more robust syntax highlighting. It still works fine, but isn't as feature-complete (no highlighting for embedded VScript).
VScript Extensions

Both of these extensions are useful, but the most useful one for popfiles is TF2 VScript Support. This extension will highlight embedded VScript in popfiles, has auto-completion, basic error logging, and a few other useful features.
VScript Debugger will allow you to attach a debugger to your running VScript code to add breakpoints, throw errors in-editor, and generally improve debugging a lot more than just plastering printl() all over your code.
There's another extension called TF2 VScript Snippets. TF2 VScript Support replaces this extension and is not necessary.
P3 aka Pseudo Population Parser is a standalone open source popfile parser that can be connected to VSCode or Notepad++. This allows you to check your popfile for potential parsing errors without needing to load them in game.
Configuring P3 for VSCode
- Extract P3 to the same directory as your popfiles (
tf/scripts/population/)
- Open VSCode, go to
File -> Open Folder (or press Ctrl + K + O) and navigate to your popfile/P3 folder and select it
- Press
Ctrl + Shift + P and search Tasks: Configure Task
- Select
Create tasks.json file from example and select Others
- Delete everything in the tasks.json file and paste the below json data instead
- Open your popfile in your main editor window and press
Ctrl + Shift + B. Or press Ctrl + Shift + P and search Run Build Task
{
"version": "2.0.0",
"tasks": [
{
"label": "Run P3",
"type": "shell",
"command": "${workspaceFolder}\\P3.exe",
"args": ["-pop", "${file}"],
"group": {
"kind": "build",
"isDefault": true
},
"presentation": {
"echo": true,
"reveal": "always",
"focus": false,
"panel": "shared"
},
"problemMatcher": []
}
]
}
That GitHub repo has a guide for setting it up for NP++
Notes:
- To use the F1-12 commands after parsing you need to use Ctrl + F1-F12.
- P3 is not configured to parse custom rafmod syntax by default, set
bool_unsafe to true in P3's config.ini
With all of this configured, the easy part is over with. The hard part is making something enjoyable and well balanced for people to play. Go out and make stuff, see what sticks, see what doesn't, and try your best to make the best MvM missions you can.